
User Manual
Welcome to MapleMate. This manual will help you get started.
Bring a friend? Get 5 days added to your license!
Write a review? Get 5 days added to your license!
1. Getting Started
Download all required files below and follow the installation order.
Step 1 — Main Application
Farmer-Beta 15_4 - up to date.zip
Also includes: additional files at same app folder.zip
Step 2 — Required System Files
Required 2 - place at C main directory.zip
Extract and place contents directly into C:\
Step 3 — Image Uploader & Driver
Image Uploader + Driver Installer.zip
Run the driver installer before launching the app
⚠ Generating a License — Skip if you already have a username and password
- Launch Image Uploader + Driver Installer
- Enter your desired username and password
- Enter the code you received
- Press Generate License
- From now on these credentials are your login info
Driver Installation — Inputs
If you are using a Raspberry Pi Pico:
Simply drag the firmware file provided to you onto the Pico drive. After a few seconds it will be fully usable.
If you are NOT using a Pico:
- Open Image Uploader + Driver Installer
- Check Enable Driver Installers
- Click Install Driver 2
- Verify it works: open the main app → Settings tab → click Test Keyboard at the bottom
⚠ Important
The main application must be started after the driver is installed — otherwise Driver 2 won't give any input.
If it doesn't alt-tab, install Driver 1 instead — it always works but is less stealthy.
GeForce NOW / remote desktop users should use Driver 1.
2. GeForce NOW Setup — Optional
Only relevant if you are playing MapleStory through GeForce NOW. Skip this section if you are running the game locally.
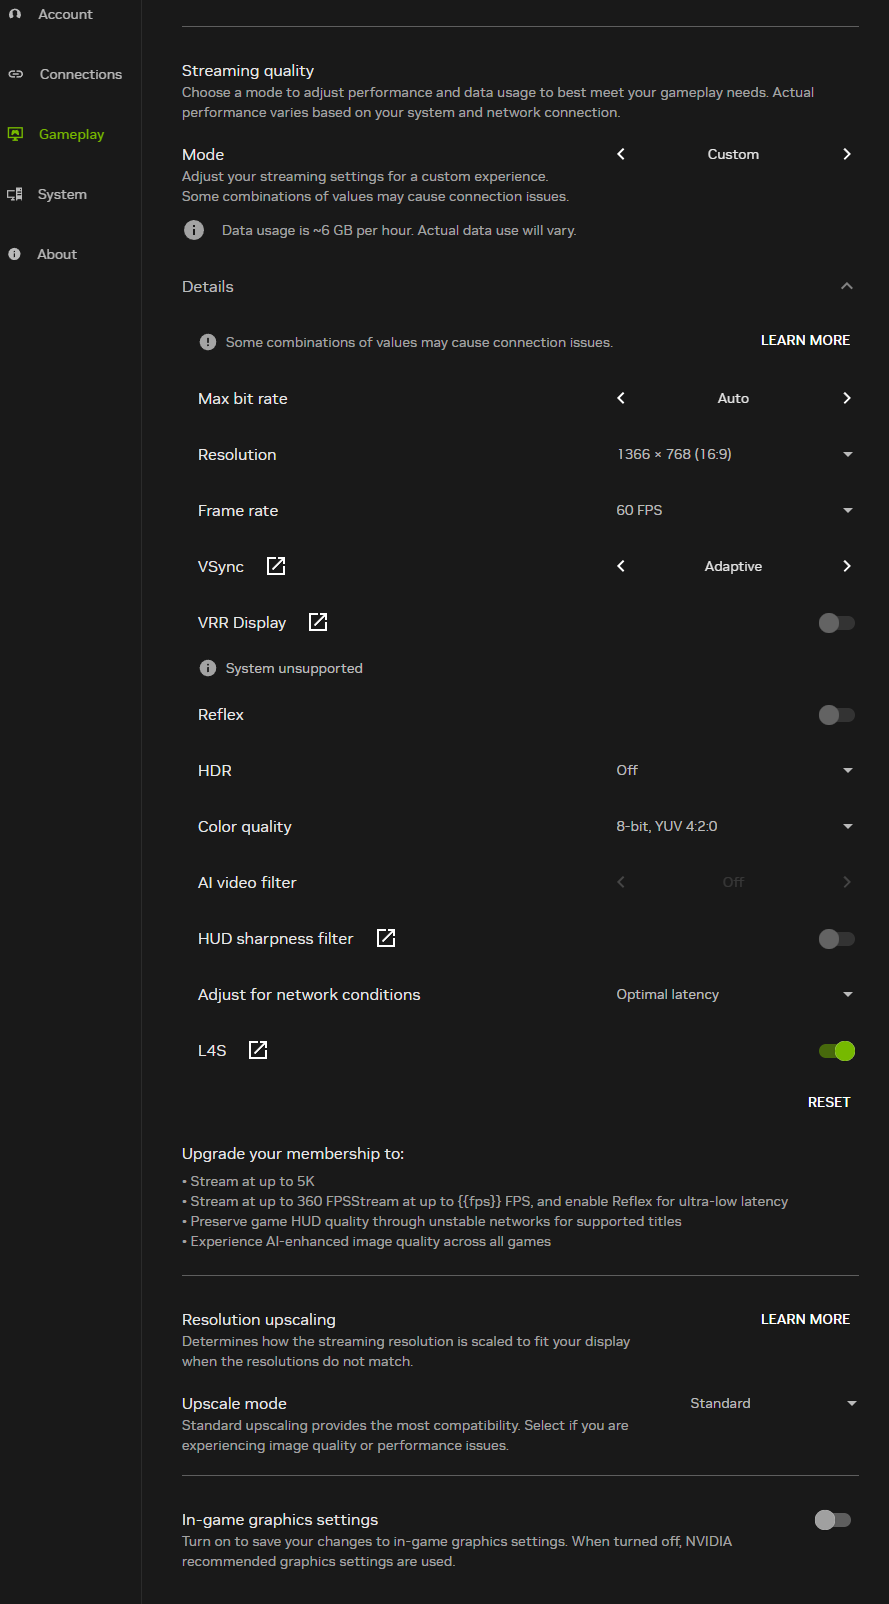
Step 1 — GeForce NOW Streaming Settings
In the GeForce NOW app go to Settings → Gameplay and set:
- Mode: Custom
- Resolution: 1366 × 768 (16:9)
- Frame rate: 60 FPS
- VSync: Adaptive
- AI video filter: Off
- HUD sharpness filter: Off
- In-game graphics settings: Off
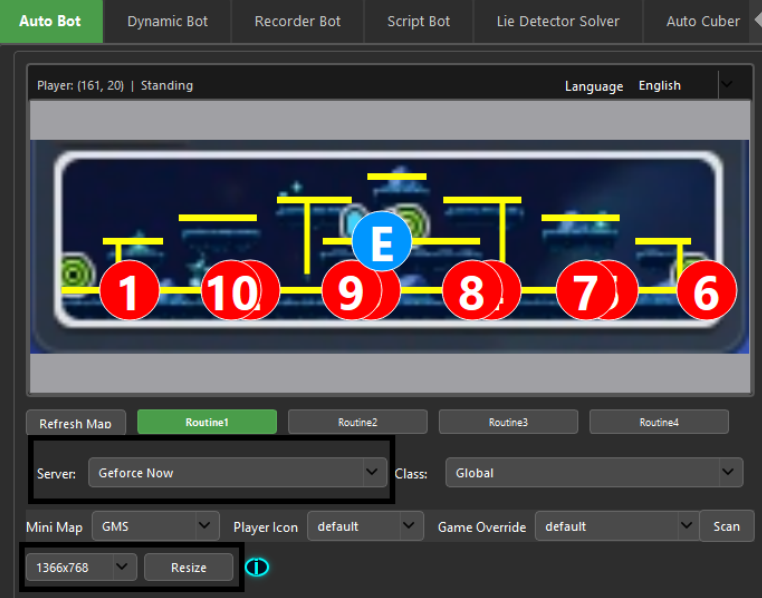
Step 2 — Configure MapleMate
- In the bot app, set Server to Geforce Now
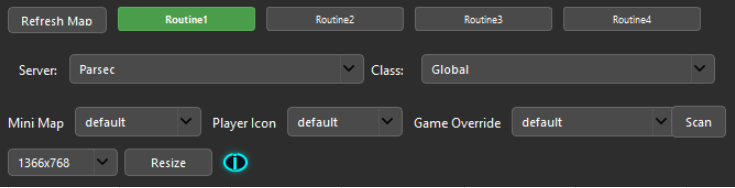
- Set resolution to 1366x768
- Press the Resize button — this resizes the app window to match GeForce NOW's stream
⚠ Driver Note
GeForce NOW users should use Driver 1 for inputs. See the Getting Started section for driver installation.
3. Auto Bot
Adding Platforms
Press Add Platform Start while standing on the left side of the platform.
Press Add Platform End while standing on the right side of the platform.
Adding Ropes
Press Add Rope Start while hanging on the bottom of the rope.
Press Add Rope End while standing on the platform the rope is connected to.
Adding Summons
Walk to the locations where you want to cast summons and press the summon button. You can set a cast direction per placement.
💡 Tip
Avoid setting a direction unless necessary — it makes summon placement take longer.
In KeyBinds, enable each summon and set proper cooldowns.
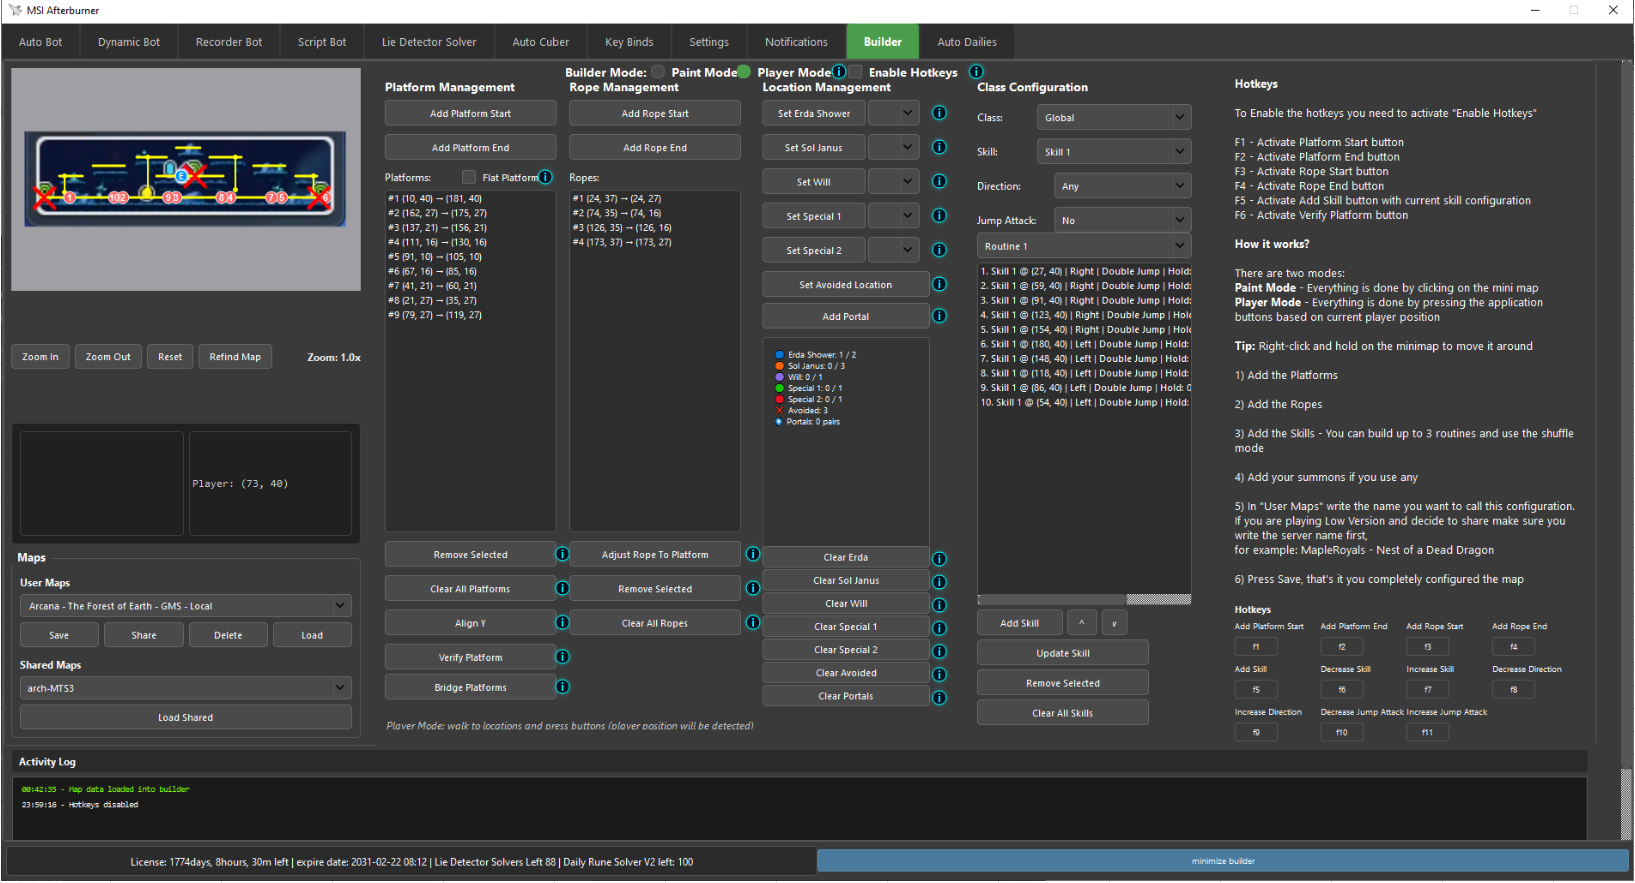
Avoided Locations
Walk to a location you want the bot to avoid and press the button. The bot will try to avoid it but may still use it occasionally. Useful for map portals.
Add Portals
Stand exactly in the center of the portal entrance and press Add Portal.
Go to the exit location and press Add Portal again.
⚠ Important
Be precise — if you're not standing exactly in the center of the portal your character will get stuck.
You can adjust portal behavior in the Settings tab.

Skill Actions & Classes
Choose one of the Global Classes or Low Server Classes. Other classes may cause issues (kept for users who have maps there).
Add skill node actions at the areas you want them activated. Each node will perform with the Direction and Jump Type you configure. If direction doesn't matter, leave it on Any.
Routines
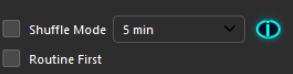
Routines 1 – 3 · Farming with Shuffle
Build up to 3 farming routines. Enable Shuffle Mode to randomly rotate between them while farming. Activated from the Auto Bot tab.
Routines 4 – 6 · Loot Cycle
Used for loot cycle — the bot walks to the locations you set, in order. Activated from the Settings tab. If more than one loot routine is created, shuffle between them is automatic.

Save & Load
Give the map a name and press Save. It will be bound to your account for the class you built it with. If you switch class you won't see the map.
Go to the Auto Bot tab, load the map, and press Start.
4. Dynamic Bot
Adding Platforms
Press Add Platform Start while standing on the left side of the platform.
Press Add Platform End while standing on the right side of the platform.
Adding Ropes
Press Add Rope Start while hanging on the bottom of the rope.
Press Add Rope End while standing on the platform the rope is connected to.
Adding Summons
Walk to the locations where you want to cast summons and press the summon button. You can set a cast direction per placement.
💡 Tip
Avoid setting a direction unless necessary — it makes summon placement take longer.
In KeyBinds, enable each summon and set proper cooldowns.
Avoided Locations
Walk to a location you want the bot to avoid and press the button. The bot will try to avoid it but may still use it occasionally.
Add Portals
Stand exactly in the center of the portal entrance and press Add Portal.
Go to the exit location and press Add Portal again.
⚠ Important
Be precise — if you're not standing exactly in the center of the portal your character will get stuck.
You can adjust portal behavior in the Settings tab.
Set Checkpoints
Set Checkpoint skills in the builder. It doesn't matter which skill you assign — just place them as Checkpoint. The bot will move to checkpoints if it doesn't see visible monsters for the configured time.

Once done, give the map a name and Save. It will be bound to your account for the class you built it with. If you switch class you won't see the map.
Upload Player Tracker Images
Upload the player tracker images you'll use. Normally a Medal is more than enough.
Medal Image Example

Image Uploader
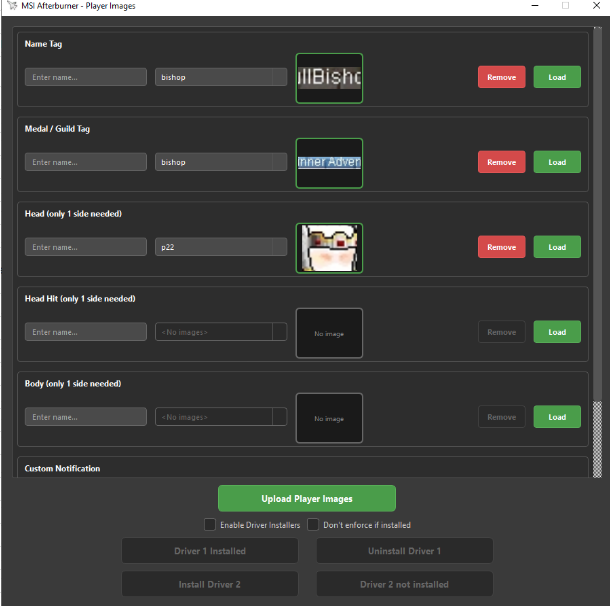
💡 Recommendation
If changing maps with different backgrounds, swap tracker images that are affected by the background — for example, half-transparent name tags and medals like shown in the image uploader.
Dynamic Bot Tab Settings
Use Option 3 or 4 — these are pure AI in action. 5+ detections per second are more than enough.

Recommended Low Version Settings

Recommended High Version Settings

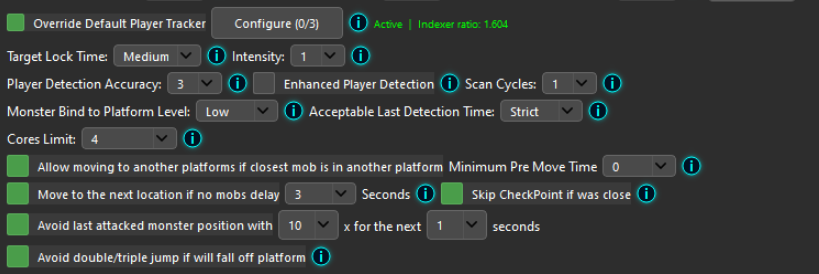
Player Tracker Selection
Choose the player tracker images you uploaded and set the confidence %. Using too low a value can cause false positives when it doesn't find your character.
Loot Cycle
Routines 4 – 6 · Loot Cycle
Used for loot cycle — the bot walks to the locations you set, in order. Activated from the Settings tab. If more than one loot routine is created, shuffle between them is automatic.
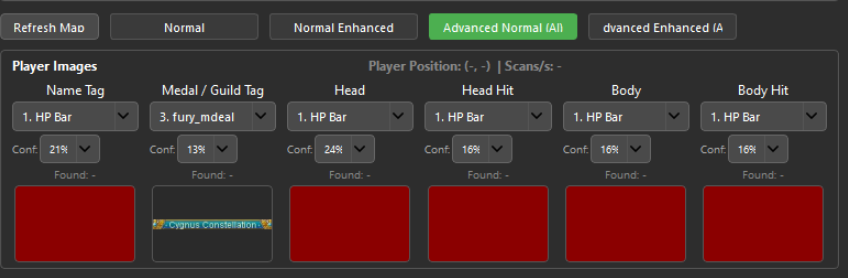
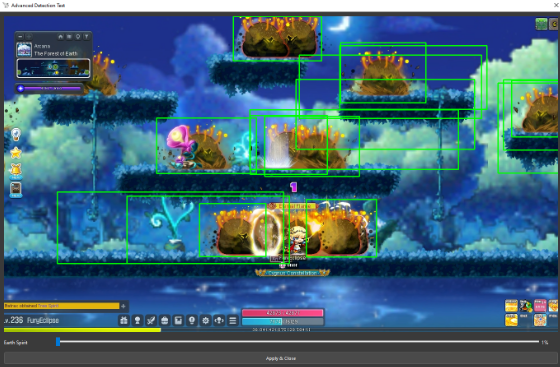
Monster Detection
Configure the monster values. Normally the sweet spot is 4 V1 or 4 V2. Keep in mind Advanced AI is slower but more accurate — if non-Advanced AI works fine, stick to it.
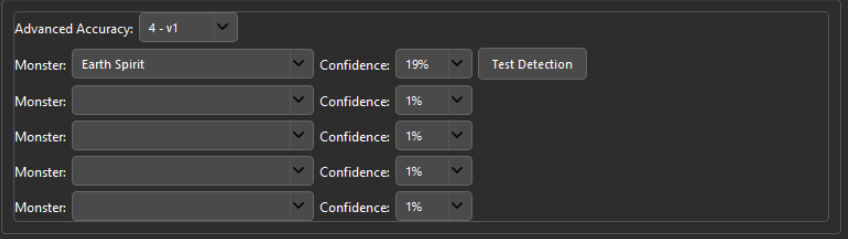
Press Test Detection.
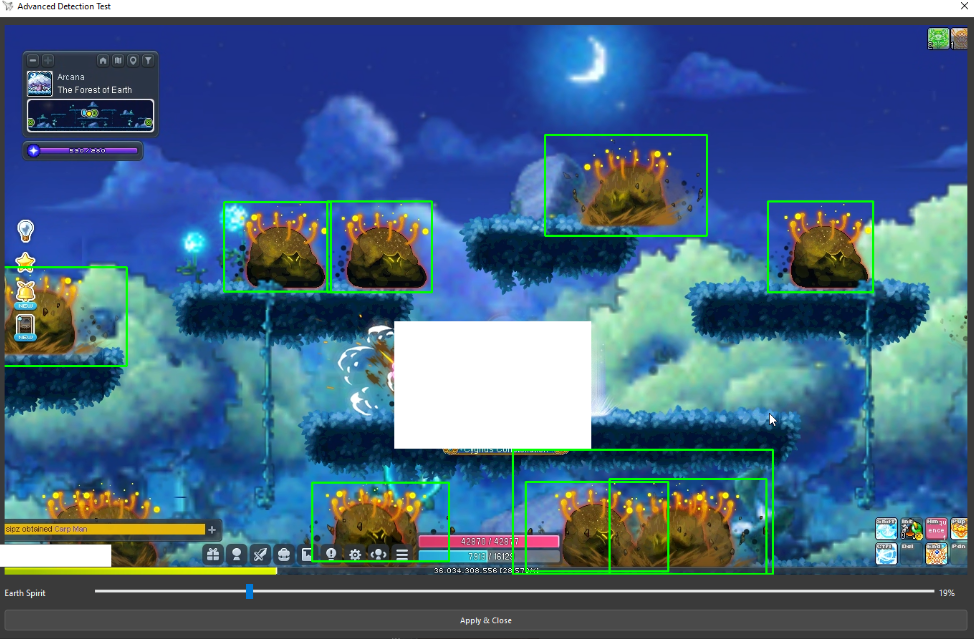
Play with the slider — go as low as you can without getting giant boxes.
❌ Bad Example — Giant Boxes
Start
Press Apply & Close.
Load the map and press Start.
5. Static Configuration
Binding Game Window — Auto Bot Tab
MapleStory Worlds
Must be on 1280×720 windowed mode. If you accidentally stretched the window with the mouse, change to another resolution and back to 1280×720.
High Version Servers
Must be on 1366×768. GeForce NOW or any remote desktop requires using the Resizer.
Server Selection
Choose the server you are playing — this identifies which game window to search for. Each server name has a specific Minimap type it will search for.
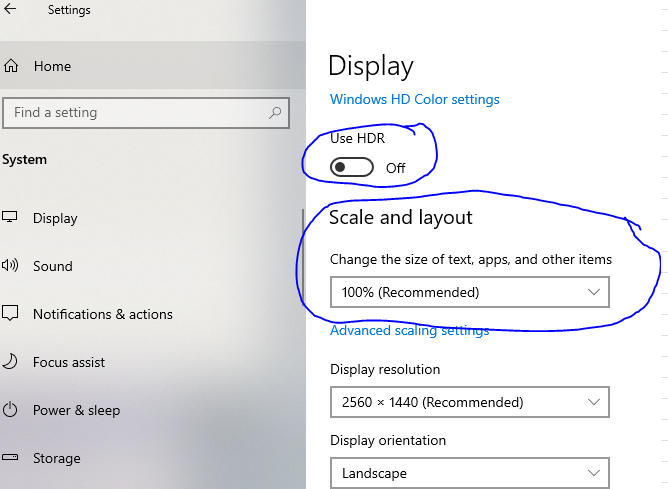
⚠ Desktop Scaling & HDR
Scaling OR HDR in desktop settings will break detection. Set Scale to 100% and HDR Off.
You can override the selected window by pressing the Scan button and choosing the game process.
Some servers need a Minimap override — go through the Minimap names in the box and press Refresh Map until the Minimap is captured.
If needed, override the Player Icon by changing it in the box.
Calibration
Press Refresh Map to calibrate the minimap. Every time the game client moves, recalibration is required.
Movement Settings
Identify which movement types the bot is allowed to use.
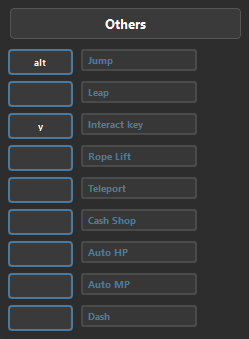
- •Set the Jump Key — without this the bot will not work.
- •Set the other movements you want to use.
- •If you use Rope Lift, Teleport, or Dash you must set the key.

Press the Configure button for each movement you want to use and focus the game.
- •Max fall gap — recommended max (100) unless your server has issues with high platforms.
- •Double Jump / Triple Jump / TP Left Right / Dash — be on a flat long platform.
- •TP Up — be below a platform, or adjust ±values from the builder player position coordinate.
- •TP Down — be above a platform, or adjust ±values from the builder player position coordinate.
- •Rope Lift — be below a platform or adjust ±values; typically set around 60.
You can also set values manually, or do the actions yourself and calculate gaps by watching the builder.
Movement accuracy — identifies how accurately the position is confirmed. Default / Low is normally what you want.
You have explanations in the info boxes.

💾 Presets
You can save presets — it saves the entire Movement + Attacker area settings and you can load them for any class.
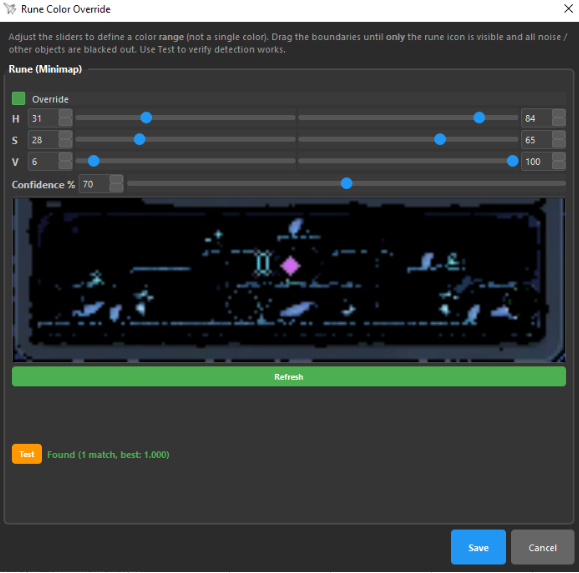
Rune Solver
- •In the Settings tab, enable the rune solver.
- •If your server does not have spinning runes, do NOT enable "Solve Spinning Runes".
- •Set reasoning level to Minimal and enable the Optimizer.
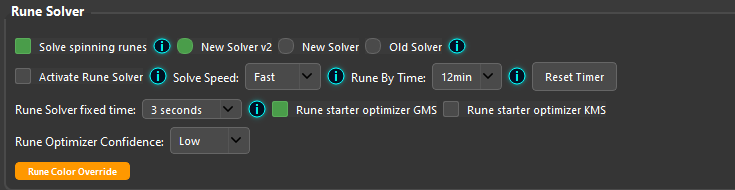
In Keybinds set the Interact Key — otherwise the bot won't open the rune.
You can override the rune color if you get false positives — this can happen when Rune By Time is enabled.
✅ Good Configure
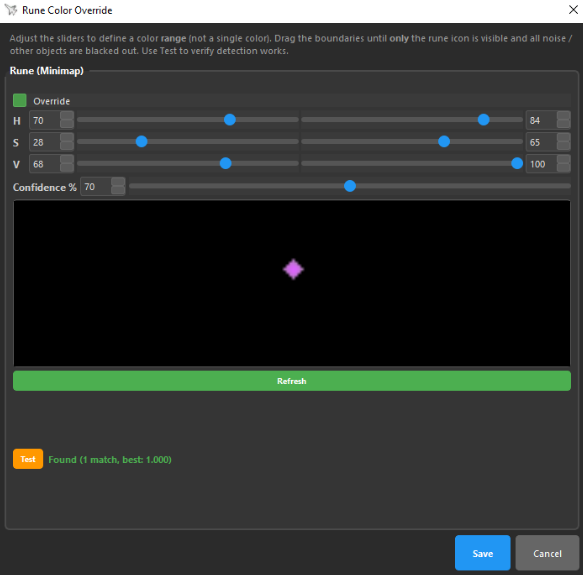
❌ Bad Configure — Too much noise
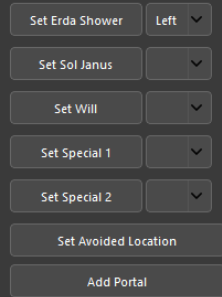
Auto Consumables & Auto Buffs
Place the keys that will use your consumables / buffs. The first value is how frequently it casts (Cooldown), Cast Time is how long the buff animation takes to finish.
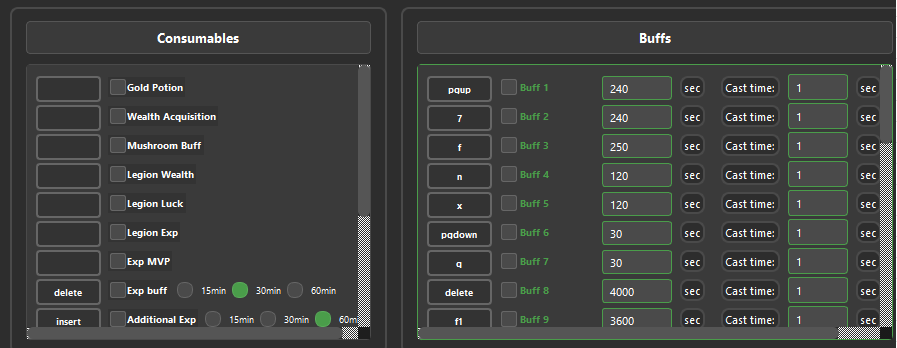
Summons
Place the keys for your summons. The first value is the Cooldown, Cast Time is the summon animation duration. Summon locations are set in the Builder tab.
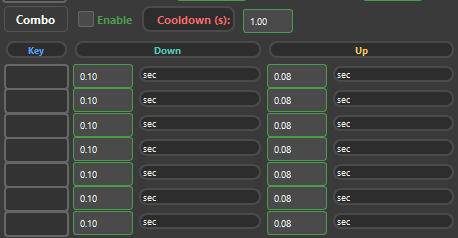
Combo
Combo is a sequence of keys with no time jitters. The values you set are used exactly as entered — this is highly NOT recommended unless you know what you are doing.
Masking the App
Mask App makes the application invisible to screenshots and recordings, making it more secure from inspection.
Always enable "Use New Movement".

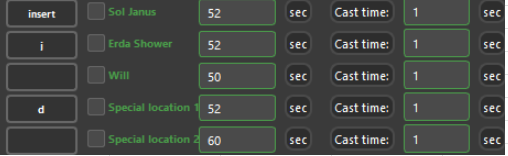
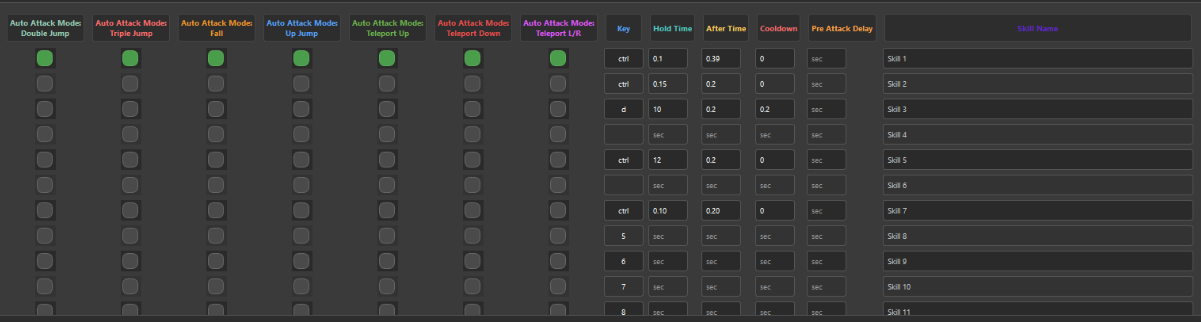
Auto Attacker Mode
Auto Attacker Mode casts skills while moving to set locations. You decide which movement type is used and how long after that movement the attack is cast.
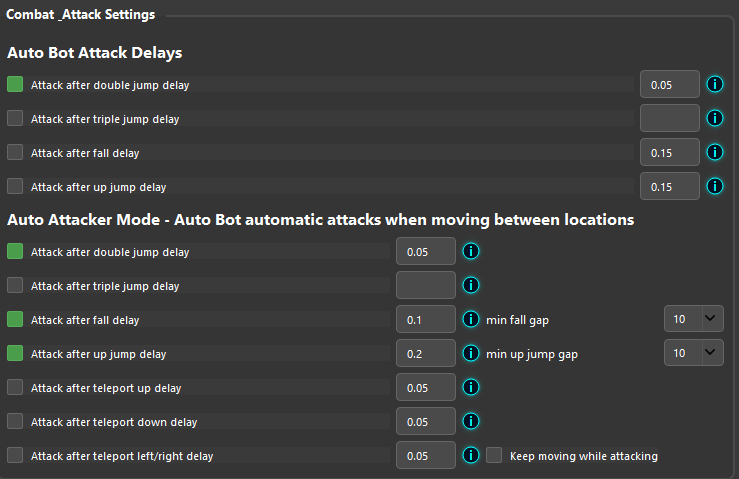
Attack is cast 0.01s after a Double Jump.
Attack is cast 0.2s after falling.
Attack is cast 0.2s after an up jump.
💡 Mages
Always use at least 0.1s value. Do not enable "Keep moving while attacking".
The green dot should be on the skill used for the attacker mode action. You can assign different skills per movement type. No need to set anything in the builder.
Even if you aren't using these attack modes, the dots can stay — you only need to disable the Attacker Mode movement checkbox in the Settings tab.
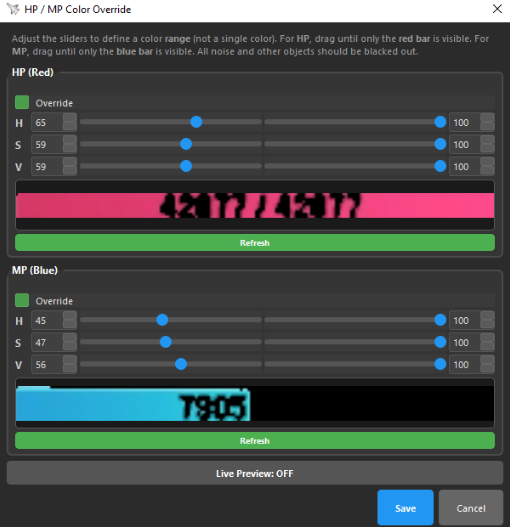
Custom Auto HP / Auto MP
Press the Set button in the Settings tab — the game window will pop up. Select the area of the HP / MP and confirm.
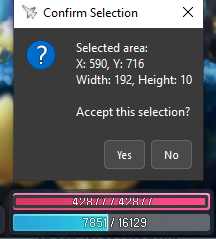
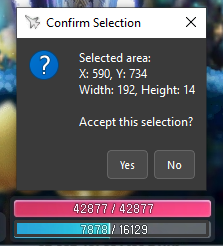
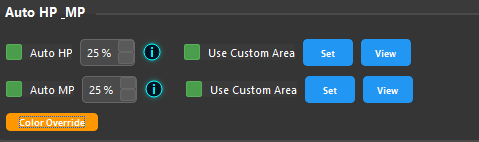
Play with the values until you see only the color of the HP / MP — the numbers should turn black, meaning white has been masked out.
6. Notifications
Map Changed Notification
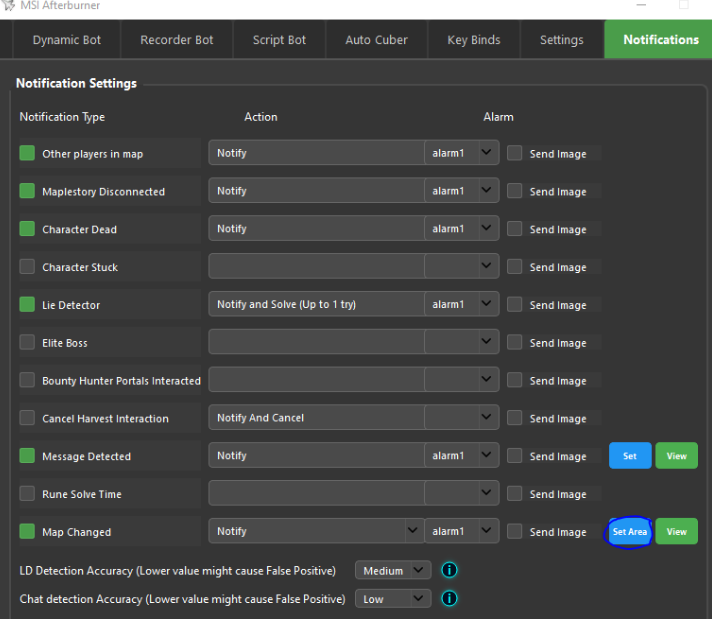
Press Set Area.
Select the region to monitor.
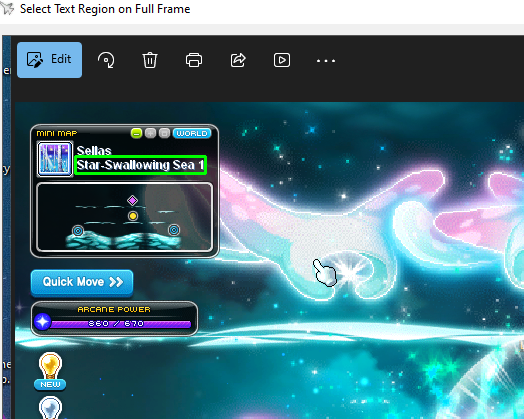
Press OK.
Now activate the Map Changed feature — it also works as a DC detector. The setting is saved after login. Press View to confirm the area is correct.
Message Detected
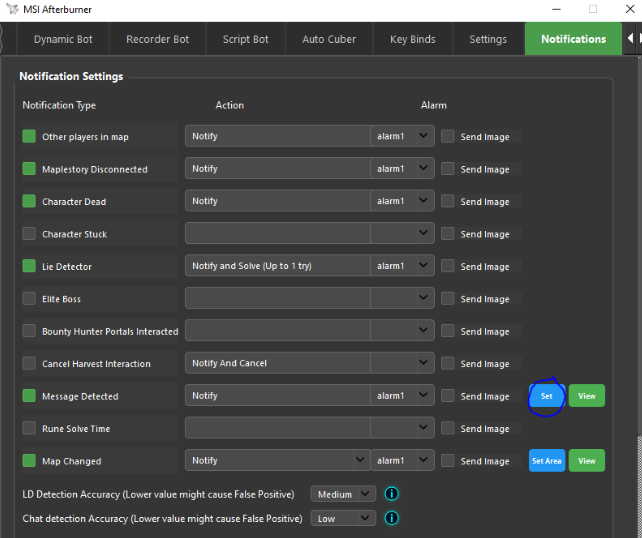
Press Set Area and select the area to scan for chat popups.
Select the minimum chat box size (to avoid false positives).
Select the maximum chat box size (to avoid false positives).
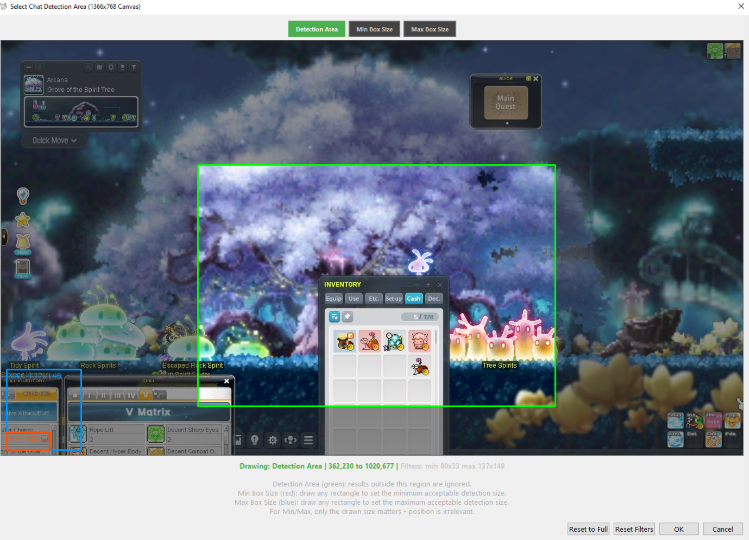
Press OK. Activate the notification. Press View to confirm the area is correct.
⚠ Sensitivity
This notification has a high false positive rate as it is very sensitive. You can control the sensitivity, but false positives cannot be fully eliminated.

Lie Detector Solver
Enable the solver by turning on the notification with "and Solve". For Ranmelle, the 5 second delay option from the combos is recommended.
You can configure the number of retries and an initial delay if the lie detector text takes time to load.
Character Stuck
This notification has a built-in feature that tries to release the character if it is actually stuck. Keep in mind it will also trigger if the character attacks at the exact same location for a long time.
Other Notifications
Other notifications are straightforward — keep in mind you may need to mask people colors using the override button ranges, just like the rune color override described in Static Configuration.
7. Auto Dailies
Setup
Configure a map with a routine for every map you are going to do a daily.
Fill the boxes with the maps you created for each daily.
Settings
World Map Key Shortcut
Set the World Map Key shortcut. For example W — if this is not set, Auto Dailies will not work.
Time to wait after teleport to next map
How long it waits before starting after the World Map teleport completes. A good starting point is 5 seconds — adjust to what fits your setup.
Skip teleport for first map
Avoids teleporting for the first daily. Enable this if you are already at the first map when you start.
Skip checkboxes
Use the Skip checkboxes to skip individual dailies. For example, if you stopped Auto Dailies and need to continue from daily 3, enable Skip for dailies 1 and 2. Or if you already farmed a map today (e.g. daily 4), skip it — the bot will continue to daily 5. The skip order doesn't matter.
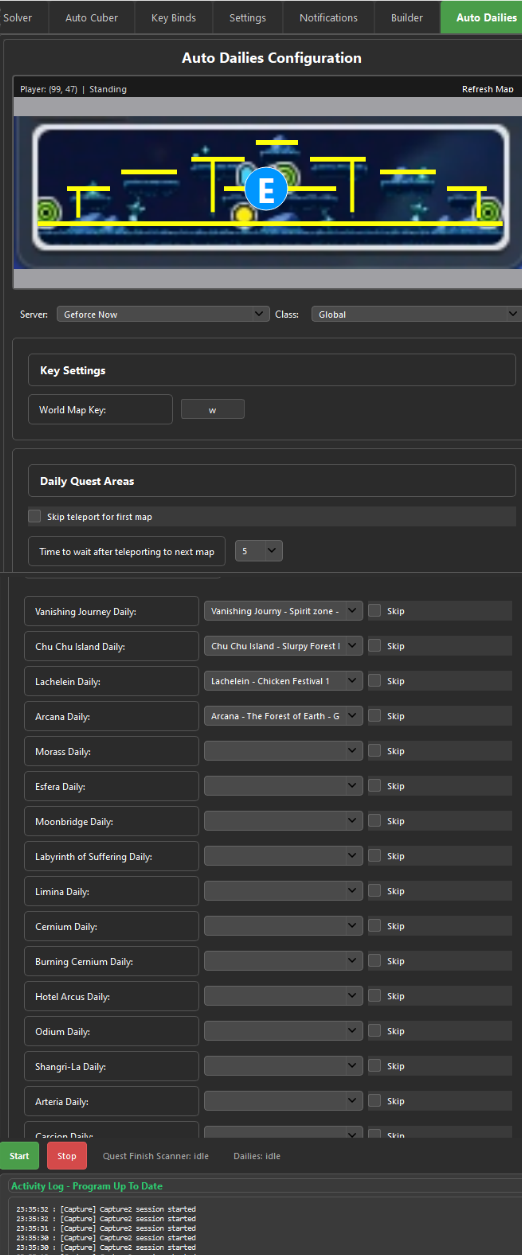
⚠️ Important — Favorite Maps Order
- The Favorite Maps order matters!
- First daily must be at the top.
- Second daily must be second from the top.
- Third daily must be third from the top, and so on.
- You can use up to 7 dailies.
When all dailies are complete, an alarm1 sound will play and a Telegram notification will be sent.
8. Recorder Mode
Recorder Mode has built-in explanations inside the application.
9. Script Mode
Script Mode has built-in explanations inside the application.
10. Telegram
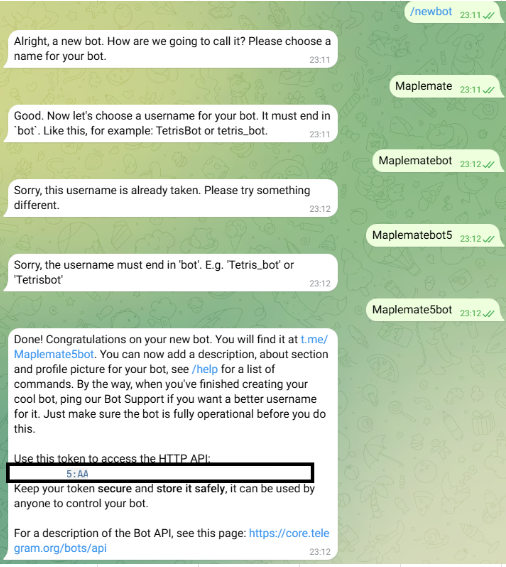
Creating Your Bot Token
Open Telegram and search for BotFather.
Start a conversation with BotFather by typing /start.
Use the command /newbot to create a new bot.
Follow the prompts — name your bot (e.g. MyFarmBot) and choose a username ending in "bot" (e.g. MyFarmBot_Bot).
BotFather will give you a unique token — copy it and paste it into the bot settings.
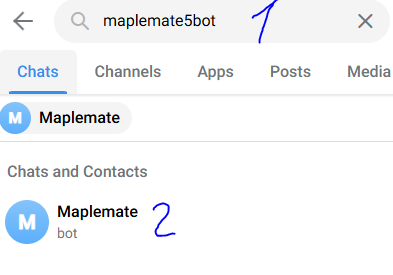
Search for the bot you created in Telegram and press Start.
Getting Your User ID
Go to Telegram and search for @userinfobot.
Copy the ID it sends you and set it in the bot settings.
Set the HTTP API token from BotFather as well.

✅ Test It
If configured properly, pressing the Test button should send you a message on Telegram.